Baremetal Environment
TripleO can be used in an all baremetal environment. One machine will be used for Undercloud, the others will be used for your Overcloud.
Minimum System Requirements
To deploy a minimal TripleO cloud with TripleO you need the following baremetal machines:
- 1 Undercloud
- 1 Overcloud Controller
- 1 Overcloud Compute
For each additional Overcloud role, such as Block Storage or Object Storage, you need an additional baremetal machine.
The baremetal machines must meet the following minimum specifications:
- multi-core CPU
- 4 GB memory
- 60 GB free disk space
TripleO is supporting only the following operating systems:
- RHEL 7.1 x86_64 or
- CentOS 7 x86_64
Preparing the Baremetal Environment
Networking
The overcloud nodes will be deployed from the undercloud machine and therefore the machines need to have have their network settings modified to allow for the overcloud nodes to be PXE boot’ed using the undercloud machine. As such, the setup requires that:
- All overcloud machines in the setup must support IPMI
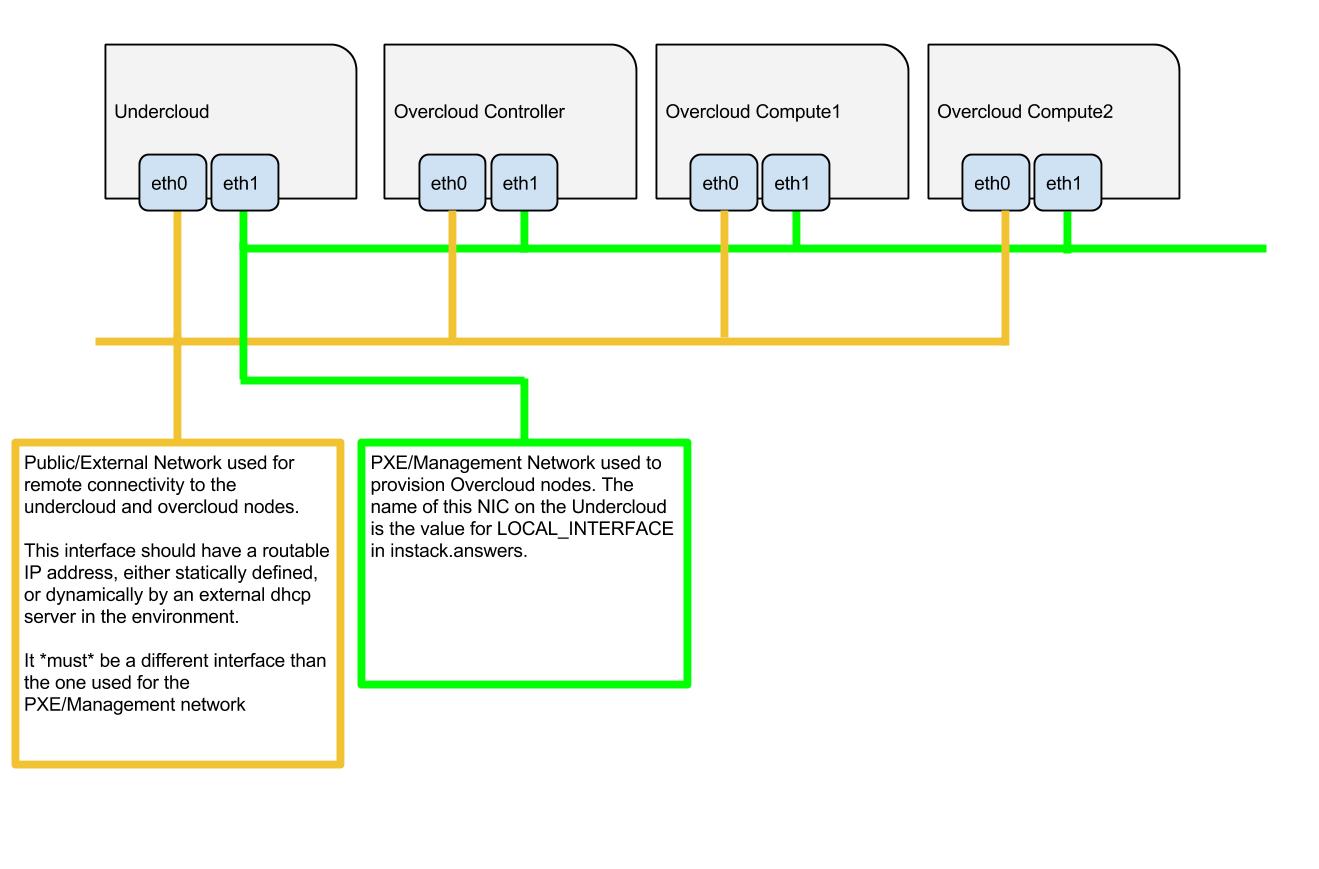
- A management provisioning network is setup for all of the overcloud machines. One NIC from every machine needs to be in the same broadcast domain of the provisioning network. In the tested environment, this required setting up a new VLAN on the switch. Note that you should use the same NIC on each of the overcloud machines ( for example: use the second NIC on each overcloud machine). This is because during installation we will need to refer to that NIC using a single name across all overcloud machines e.g. em2
- The provisioning network NIC should not be the same NIC that you are using for remote connectivity to the undercloud machine. During the undercloud installation, a openvswitch bridge will be created for Neutron and the provisioning NIC will be bridged to the openvswitch bridge. As such, connectivity would be lost if the provisioning NIC was also used for remote connectivity to the undercloud machine.
- The overcloud machines can PXE boot off the NIC that is on the private VLAN. In the tested environment, this required disabling network booting in the BIOS for all NICs other than the one we wanted to boot and then ensuring that the chosen NIC is at the top of the boot order (ahead of the local hard disk drive and CD/DVD drives).
- For each overcloud machine you have: the MAC address of the NIC that will PXE boot on the provisioning network the IPMI information for the machine (i.e. IP address of the IPMI NIC, IPMI username and password)
Refer to the following diagram for more information
Setting Up The Undercloud Machine
Select a machine within the baremetal environment on which to install the undercloud.
Install RHEL 7.1 x86_64 or CentOS 7 x86_64 on this machine.
If needed, create a non-root user with sudo access to use for installing the Undercloud:
sudo useradd stack
sudo passwd stack  # specify a password
echo "stack ALL=(root) NOPASSWD:ALL" | sudo tee -a /etc/sudoers.d/stack
sudo chmod 0440 /etc/sudoers.d/stack
RHEL
If using RHEL, register the Undercloud for package installations/updates.
RHEL Portal Registration
Register the host machine using Subscription Management:
sudo subscription-manager register --username="[your username]" --password="[your password]"
# Find this with `subscription-manager list --available`
sudo subscription-manager attach --pool="[pool id]"
# Verify repositories are available
sudo subscription-manager repos --list
# Enable repositories needed
sudo subscription-manager repos --enable=rhel-7-server-rpms \
     --enable=rhel-7-server-optional-rpms --enable=rhel-7-server-extras-rpms \
     --enable=rhel-7-server-openstack-6.0-rpms
RHEL Satellite Registration
To register the host machine to a Satellite, the following repos must be synchronized on the Satellite and enabled for registered systems:
rhel-7-server-rpms
rhel-7-server-optional-rpms
rhel-7-server-extras-rpms
rhel-7-server-openstack-6.0-rpms
See the Red Hat Satellite User Guide for how to configure the system to register with a Satellite server. It is suggested to use an activation key that automatically enables the above repos for registered systems.
Configuration Files
instackenv.json
Create a JSON file describing your Overcloud baremetal nodes, call it
instackenv.json and place in your home directory. The file should contain
a JSON object with the only field nodes containing list of node
descriptions.
Each node description should contains required fields:
pm_type- driver for Ironic nodes, see Ironic Drivers for detailspm_addr- node BMC IP address (hypervisor address in case of virtual environment)pm_user,pm_password- node BMC credentials
Some fields are optional if you’re going to use introspection later:
mac- list of MAC addresses, optional for bare metalcpu- number of CPU’s in systemarch- CPU architecture (common values arei386andx86_64)memory- memory size in MiBdisk- hard driver size in GiB
It is also possible (but optional) to set Ironic node capabilities directly in the JSON file. This can be useful for assigning node profiles or setting boot options at registration time:
capabilities- Ironic node capabilities. For example:"capabilities": "profile:compute,boot_option:local"
For example:
{
    "nodes": [
        {
            "pm_type":"pxe_ipmitool",
            "mac":[
                "fa:16:3e:2a:0e:36"
            ],
            "cpu":"2",
            "memory":"4096",
            "disk":"40",
            "arch":"x86_64",
            "pm_user":"admin",
            "pm_password":"password",
            "pm_addr":"10.0.0.8"
        },
        {
            "pm_type":"pxe_ipmitool",
            "mac":[
                "fa:16:3e:da:39:c9"
            ],
            "cpu":"2",
            "memory":"4096",
            "disk":"40",
            "arch":"x86_64",
            "pm_user":"admin",
            "pm_password":"password",
            "pm_addr":"10.0.0.15"
        },
        {
            "pm_type":"pxe_ipmitool",
            "mac":[
                "fa:16:3e:51:9b:68"
            ],
            "cpu":"2",
            "memory":"4096",
            "disk":"40",
            "arch":"x86_64",
            "pm_user":"admin",
            "pm_password":"password",
            "pm_addr":"10.0.0.16"
        }
    ]
}
Ironic Drivers
Ironic drivers provide various level of support for different hardware. The most up-to-date information about Ironic drivers is at http://docs.openstack.org/developer/ironic/deploy/drivers.html, but note that this page always targets Ironic git master, not the release we use.
There are 2 generic drivers:
pxe_ipmitooldriver uses ipmitool utility to manage a bare metal node, and supports vast variety of hardware.pxe_sshis a special driver for testing Ironic in the virtual environment. This driver connects to the hypervisor to conduct management operations on virtual nodes. In case of this driver,pm_addris a hypervisor address,pm_useris a SSH user name for accessing hypervisor,pm_passwordis a private SSH key for accessing hypervisor. Note that private key must not be encrypted.
Ironic also provides specific drivers for some types of hardware:
pxe_ilotargets HP Proliant Gen 8 and Gen 9 systems, and is recommended for these systems instead ofpxe_ipmitool. Please refer to the current iLO driver documentation or detailed iLO documentation for Kilo version.pxe_dractargets DELL 11G and newer systems, and is recommended for these systems instead ofpxe_ipmitool.
There are also 2 testing drivers:
fake_pxeprovides stubs instead of real power and management operations. When using this driver, you have to conduct power on and off operations, and set the current boot device, yourself.fakeprovides stubs for every operation, so that Ironic does not touch hardware at all.